PHOTON XENON TACHYON
TACHYON or PHOTON can use networking technology to operate simultaneously and transparently on multiple servers controlled from a single unit. The first step in creating a Project is to establish a Server Group. Once servers are assigned in a group, TACHYON or PHOTON automatically creates a ring network to maintain communication between each server. Servers within a group will share media content, maintain communication and sync together.
Server Group Creation
- Select from the main menu OR press Alt + S to open the Settings module.
- Make sure the
TACHYON or PHOTON tab is selected.
- Click on the
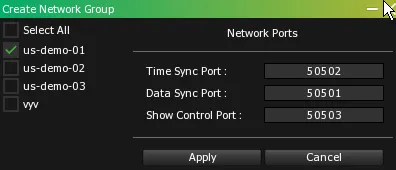
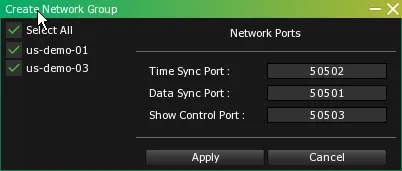
Create Network Group button to open the Create Network Group window. A list located on the left side of the window will allow you to include or exclude servers from the group by checking or not checking their associated checkboxes.
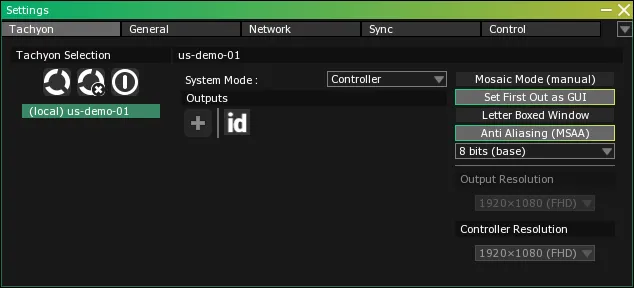
If TACHYON or PHOTON has been launched on all of your servers, and if the servers reside on the same network, they should appear in the TACHYON or PHOTON Selection servers list located on the left side of the Settings window.
- Select the servers you want in the group by checking the boxes next to their name. When selected, the servers will be identified by a green check mark.
- Click on the
Apply button to create a Server Group.
Removing Servers from a Server Group
- Select from the main menu OR press Alt + S to open the Settings module.
- Make sure the
TACHYON or PHOTON tab is selected.
- Select the server you want to remove from your current group by clicking on its name in the TACHYON or PHOTON Selection servers list.
- Click on the
Remove Selected TACHYON or PHOTON from group button. A confirmation box window will appear in order to validate your selection. Click on the OK button if you still want to remove the server from the group.
- Repeat this last operation until all of the servers you want to remove are not in the list anymore.
Remove and Shutdown TACHYON or PHOTON
This operation will remove a server from a group and shut down TACHYON or PHOTON on the server.
- Select from the main menu OR press Alt + S to open the Settings module.
- Make sure the
TACHYON or PHOTON tab is selected.
- Select the server you want to remove from your current Server Group and shut down by clicking on its name in the TACHYON or PHOTON Selection servers list.
- Click on the ON/OFF button. A confirmation box window should appear in order to validate your selection. Click on the
OK button if you still want to remove the server and shut down TACHYON or PHOTON.
- Repeat this operation until all of the servers you want to remove are no longer in the Servers list.
Multiple Server Groups
Most projects will use a single Server Group. However, you might encounter situations where completely independent video installations co-exist within the same project.
For example: A Server Group might be dedicated to a video installation in a theater lobby while a second Server Group runs the video projections on the main stage. It is under these circumstances that multiple Server Groups should be considered.
Monitoring and Troubleshooting
Once a Server Group is created or modified you should make sure the TACHYON or PHOTON Network is fully functional and that all of your servers are communicating properly.
- Select from the main menu OR press Alt + N to open the Network Monitor module. This module displays information about each server in your Server Group.
The Network Monitor module provides feedback regarding resource usage (CPU, disk, RAM, VRAM), GPU performance (megabits per frame and temperature) and shows the project’s current frame rate output.

If a server is missing from the list, if its feedback cells are blank, or if the connection state cell shows a warning sign, it means communication problems are affecting the network. If such problems arise, you should check the following:
Physical Network Connections
Make sure the Ethernet cables are in good working order and are properly connected to the appropriate physical network interfaces.
IP Addressing
Make sure your servers coexist on the same network. Their IP addresses should share the same network prefix and subnet number (the first 3 octets in the IP address).
Traffic Management
Some network switches can filter out traffic, or a VLAN might have been set up on one of your servers. Make sure there is no interference of this kind on your network.
Network Ports
TACHYON or PHOTON uses specific network ports to synchronize data and transmit Show Control commands through a Server Group. Make sure the network ports on the servers included in the Server Group match:
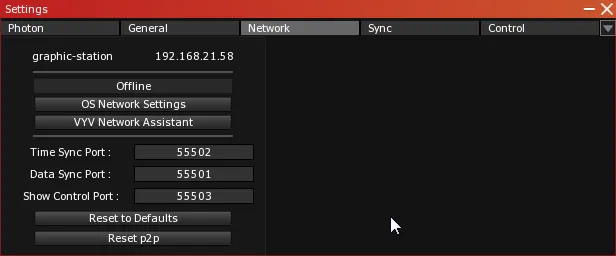
- For each server, select OR press Alt + S and select the Network tab. The window will display the port numbers corresponding to Time Sync, Data Sync and Show Control.
- Each of these port numbers should be the same across your Server Group; with each port you should see the same number for Time Sync, Data Sync and Show Control.
- If the port numbers don’t match, you can reset them to Default by clicking on the
Reset button or you can manually modify them by typing new values into their corresponding text boxes.
Warning:If you change any of the port numbers, TACHYON or PHOTON will have to be restarted on all of the servers in the Server Group.
Once this problem is identified and corrected, the server’s state will automatically change in the Network Monitor.
Network Ports Functions
TACHYON or PHOTON establishes Transmission Control Protocol (TCP) and User Datagram Protocol (UDP) communication between servers in a group in order to allow multiple devices to act as a whole. Three different ports, each characterized by a specific function, are used by TACHYON or PHOTON.
This port is dedicated to TACHYON or PHOTON’s master clock. Current time (frame accurate) is sent from the primary server (either a Controller or a Display Master server) to the secondary servers (Display servers) so each device shares the same clock.
This port is dedicated to data exchange corresponding to project structures, configurations and saves.
This port is dedicated to show related commands such as Cues. This port will be used by TACHYON or PHOTON to trigger events in the Server Group. This port might also be used by external devices or software for sending cues to TACHYON or PHOTON.
Access the Local Server Network Ports Configuration Tab
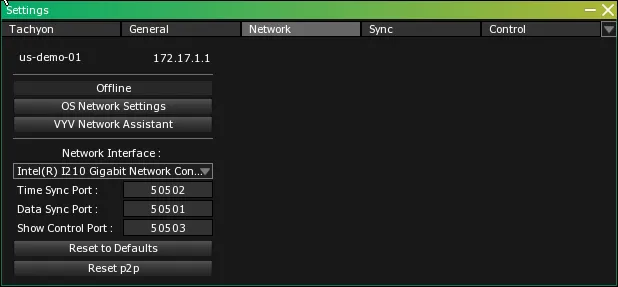
- Select from the main menu OR press Alt + S to open the Settings module and select the Network Ports tab.
Warning:While it is possible to modify a local server’s Network Ports, doing so might isolate it from other servers included in the Server Group since the port numbers need to be shared across servers.
Modify the Network Ports across the Server Group
If for any reason you need to change the Network Ports, it is best to do so while creating a Server Group. New port numbers can be assigned simultaneously to all servers included in a group on its creation. Follow these steps to change port numbers for the whole Server Group:
- Select from the main menu OR press Alt + S to open the Settings module and select the TACHYON or PHOTON tab.
- Click on the server names in the TACHYON or PHOTON Selection list you want to include in the Server Group.
- Click on the
Create Network Group button.
- Modify the Network Port numbers from their dedicated numeric fields.
- Click on the
Apply button.
Network Ports PHOTON
PHOTON establishes Transmission Control Protocol (TCP) and User Datagram Protocol (UDP) communication between servers in a group in order to allow multiple devices to act as a whole. Three different ports, each characterized by a specific function, are used by PHOTON:
Time Sync Port
This port is dedicated to PHOTON’s master clock. Current time (frame accurate) is sent from the primary server to the secondary servers so each device shares the same clock.
Data Sync Port
This port is dedicated to data exchange that corresponds to project structures, configurations and saves.
Show Control Port
This port is dedicated to show related commands such as cues. This port will be used by PHOTON to trigger events in the servers in the Server Group. This port might also be used by external devices or software for sending cues to PHOTON.